
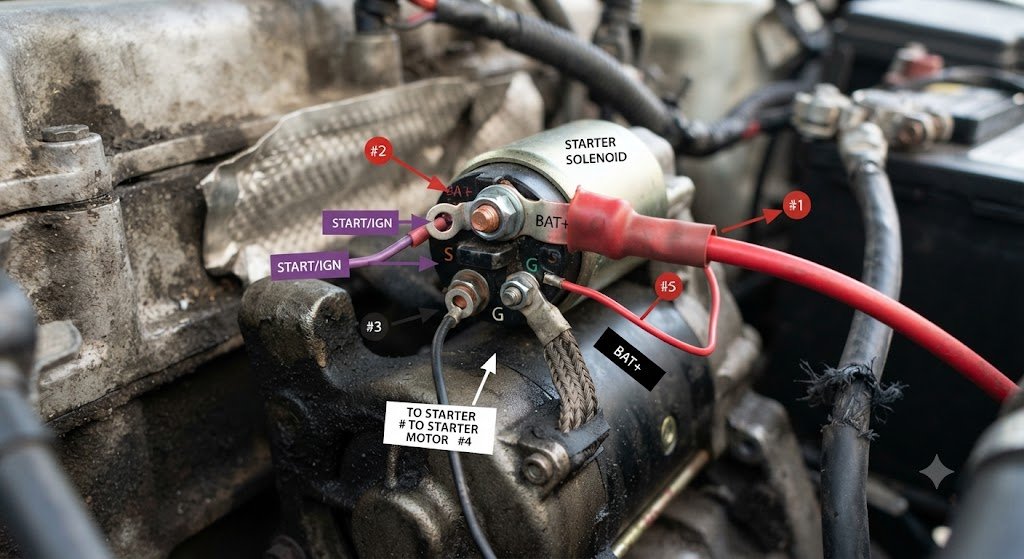
Understanding wiring starter solenoid connections is essential when repairing, replacing, or upgrading a vehicle’s starting system. A starter solenoid acts as the electrical bridge between the battery and the starter motor, allowing a small ignition signal to control a much larger current flow.
Many starting problems that appear to be caused by a bad starter motor are actually linked to incorrect wiring starter solenoid connections, damaged terminals, weak grounds, or loose battery cables. Knowing how each wire works can save time, money, and unnecessary parts replacement.
Whether you are working on a car, truck, motorcycle, tractor, boat engine, or custom project, understanding solenoid wiring basics helps you diagnose problems faster and complete repairs safely.
What Is a Starter Solenoid and Why Does It Matter?
A starter solenoid is an electrically controlled switch designed to deliver high current from the battery to the starter motor. The ignition switch cannot handle the hundreds of amps required by a starter motor, so the solenoid works as a powerful relay.
When you turn the key or press the start button:
- The ignition system sends a small electrical signal to the solenoid.
- The solenoid creates a magnetic field.
- Internal contacts connect battery power to the starter motor.
- The starter motor turns the engine crankshaft.
A properly installed wiring starter solenoid system ensures smooth engine starting and protects the vehicle’s electrical components.
Understanding Starter Solenoid Terminals
Before beginning any wiring starter solenoid project, identify the terminals correctly. Most starter solenoids have two large terminals and one or two smaller terminals.
Main Battery Terminal (B or BAT)
The battery terminal receives constant power directly from the positive battery cable.
Usually connected to:
- Positive battery cable
- Alternator charging wire
- Vehicle power distribution wires
This terminal always has battery voltage, even when the ignition is off.
Starter Motor Terminal (M or ST)
The starter terminal connects directly to the starter motor.
When the solenoid activates, electrical power flows from the battery terminal to this terminal, allowing the starter motor to operate.
Ignition Switch Terminal (S)
The S terminal receives the start signal from the ignition switch.
When you turn the key to the START position, voltage travels through this wire and activates the solenoid.
Auxiliary Terminal (I or R)
Some solenoids include an additional terminal.
This terminal may provide temporary voltage to:
- Ignition coil
- Fuel system components
- Older ignition systems
Not every vehicle uses this connection.
Basic Wiring Starter Solenoid Diagram
A standard starter solenoid wiring setup looks like this:
Battery Positive (+)
        |
        |
   Large Solenoid Terminal
        |
        |
   Starter Motor Terminal
        |
        |
    Starter Motor


Ignition Switch
        |
        |
    Small S Terminal
        |
        |
   Starter Solenoid
The negative battery cable connects directly to the engine block or chassis ground.
Step-by-Step Wiring Starter Solenoid Installation
Installing a starter solenoid is straightforward if each connection is made carefully.
Step 1: Disconnect the Battery
Always remove the negative battery cable before working on the starting system.
This prevents:
- Electrical shorts
- Sparks
- Accidental starter activation
Starter circuits carry extremely high current, so safety should come first.
Step 2: Mount the Solenoid Properly
Choose a clean, dry mounting location.
A good mounting area should:
- Protect the solenoid from water
- Provide solid grounding if required
- Keep cables short
- Prevent heat exposure
Some solenoids ground through their mounting surface, while others use dedicated ground wires.
Step 3: Connect the Battery Cable
Attach the large battery cable to the main battery terminal.
Make sure:
- The connection is tight
- The terminal is clean
- No corrosion exists
A loose connection can create resistance and cause clicking noises or slow cranking.
Step 4: Connect the Starter Cable
Attach the second large cable from the solenoid to the starter motor terminal.
This cable carries the highest current in the system.
Use the correct cable size because undersized wires can overheat.
Step 5: Connect the Ignition Wire
Connect the small ignition wire to the S terminal.
This wire activates the solenoid when starting.
If this wire is damaged or disconnected, the starter will not engage.
Wiring Starter Solenoid on Different Vehicles
Starter solenoid wiring varies depending on the vehicle type and electrical design.
Car Starter Solenoid Wiring
Modern vehicles often use integrated starter assemblies where the solenoid is attached directly to the starter motor.
Typical connections include:
- Battery positive cable
- Starter motor connection
- Ignition signal wire
- Engine ground
Computer-controlled vehicles may also include:
- Starter relay
- Security system signals
- Engine control module commands
Tractor Starter Solenoid Wiring
Tractors often use simpler systems.
A typical tractor wiring setup includes:
- Battery positive terminal → solenoid
- Solenoid → starter motor
- Key switch → solenoid activation terminal
- Battery negative → tractor frame
Older tractors may use mechanical switches instead of electronic controls.
Motorcycle Starter Solenoid Wiring
Motorcycle solenoids are usually compact but follow the same principle.
Connections include:
- Battery positive
- Starter motor cable
- Start button signal
- Ground connection
Because motorcycles use smaller batteries, poor connections can quickly cause starting failures.
Common Wiring Starter Solenoid Mistakes
Many starting issues come from incorrect installation rather than defective parts.
Reversing Battery and Starter Connections
The large terminals may look identical, but connecting them incorrectly can cause:
- Starter running continuously
- Electrical damage
- Blown fuses
Always identify terminals before connecting wires.
Poor Ground Connection
A starter requires a complete electrical circuit.
A weak engine ground can cause:
- Clicking sounds
- Slow starter movement
- No crank condition
Always inspect:
- Battery negative cable
- Engine ground strap
- Chassis connections
Using Incorrect Wire Size
Starter circuits require heavy-gauge cables.
Small wires create:
- Voltage drop
- Heat buildup
- Starter performance issues
Use manufacturer-recommended cable sizes.
Ignoring Corrosion
Corroded terminals increase resistance.
Common problem areas include:
- Battery posts
- Solenoid terminals
- Starter connections
- Ground points
Cleaning connections often fixes starting problems.
How to Test a Starter Solenoid
Before replacing a solenoid, test it properly.
Test 1: Check Battery Voltage
Use a multimeter.
A healthy battery should normally show around:
12.6 volts when fully charged
A weak battery can mimic a bad solenoid.
Test 2: Listen for Clicking
When turning the key:
Single Click
Possible causes:
- Weak battery
- Bad solenoid contacts
- Poor cable connection
No Sound
Possible causes:
- Faulty ignition switch
- Broken wiring
- Failed solenoid coil
Rapid Clicking
Usually indicates:
- Low battery voltage
- Poor battery connection
Test 3: Voltage Testing
Check voltage at the solenoid terminals.
You should see:
- Battery voltage at the main terminal
- Start signal voltage at the S terminal during cranking
If power reaches the solenoid but not the starter, the solenoid may be defective.
Wiring Starter Solenoid With a Push Button Start
Many custom vehicles use a push button starter system.
The wiring is simple:
- Battery positive → solenoid battery terminal
- Solenoid starter terminal → starter motor
- Push button → S terminal
- Battery negative → engine ground
However, the push button must be rated correctly or controlled through a relay.
Starter Solenoid Relay vs Starter Solenoid
These components are often confused.
A starter relay controls the solenoid signal.
A starter solenoid handles the high-current connection to the starter motor.
Modern vehicles may use both:
Ignition Switch
       |
       |
 Starter Relay
       |
       |
 Starter Solenoid
       |
       |
 Starter Motor
Understanding the difference helps diagnose electrical problems.
Signs of a Bad Starter Solenoid
A failing solenoid may show several symptoms.
Common warning signs include:
- Clicking sound but no engine rotation
- Starter works sometimes and fails other times
- No response when turning the key
- Starter remains engaged after starting
- Burning smell from electrical connections
Replacing a solenoid is often cheaper than replacing the entire starter assembly.
How to Maintain a Starter Solenoid Wiring System
Regular inspection prevents unexpected failures.
Follow these maintenance tips:
- Clean battery terminals regularly
- Tighten all electrical connections
- Check ground cables
- Protect wiring from heat damage
- Replace damaged connectors
- Inspect for corrosion
A few minutes of inspection can prevent a vehicle from leaving you stranded.
Safety Tips When Working With Starter Wiring
Starter systems contain extremely high electrical current.
Follow these precautions:
- Disconnect the battery before repairs
- Avoid touching positive terminals with metal tools
- Wear protective gloves and eye protection
- Never test wiring near fuel leaks
- Use insulated tools when possible
A starter circuit can create dangerous sparks even though it uses low voltage.
Frequently Asked Questions About Wiring Starter Solenoid
1. What wires connect to a starter solenoid?
Most starter solenoids require three main connections: a large battery power cable, a large starter motor cable, and a small ignition switch wire. Some models also include an auxiliary ignition terminal.
2. What happens if a starter solenoid is wired incorrectly?
Incorrect wiring can cause the starter not to work, continuous starter operation, electrical damage, or overheating cables. Always confirm terminal markings before connecting wires.
3. How do I know which terminal is positive on a starter solenoid?
The large terminal connected to the battery cable is the positive power input. The other large terminal connects to the starter motor. Terminal markings such as BAT, B, S, and M help identify connections.
4. Why does my starter solenoid click but the engine does not start?
A clicking solenoid may indicate low battery voltage, damaged cables, poor grounding, worn solenoid contacts, or a faulty starter motor.
5. Can I replace a starter solenoid myself?
Yes, many starter solenoids can be replaced with basic tools. However, correct wiring identification is critical because connecting terminals incorrectly can damage the starting system.
Final Thoughts on Wiring Starter Solenoid
A reliable wiring starter solenoid setup is the foundation of a dependable starting system. Although the component itself is simple, incorrect connections, weak grounds, and damaged cables can create confusing electrical problems.
The key is understanding each terminal’s purpose: battery power enters through the main terminal, the starter receives current through the output terminal, and the ignition switch controls activation through the small signal wire.
Before replacing expensive parts, inspect the wiring first. A clean connection, proper cable size, and correct terminal placement often solve starting problems quickly.
Take your time, follow the wiring diagram, and always prioritize safety when working around high-current electrical systems. A correctly wired starter solenoid will provide years of reliable engine starting performance.
